How VPS - How to use/setup VPS
  • Home
  • Management guides
    • Web servers software
      • Directadmin
      • Hocvps Script
      • Centmin Mod
      • CWP
      • Kloxo-MR
      • Plesk
    • Control Panels
    • Securing VPS/Servers
      • SSL Certificates
      • Upgrading
      • Authentication
  • Operating System
    • CentOS
    • Fedora
    • Debian
    • Linux
    • Arch
    • BSD
    • CoreOS
  • Reviews
  • Coupon
    • Domain Coupon
    • Hosting Coupon
No Result
View All Result
How VPS - How to use/setup VPS
No Result
View All Result
Home Control Panels

How To Set Up And Use Fastcgi Environment In (IIS) 7, IIS 7

How VPS by How VPS
November 2, 2018
in Control Panels
0
How To Set Up And Use Fastcgi Environment In (IIS) 7, IIS 7
0
SHARES
99
VIEWS
Share on FacebookShare on Twitter

Contents

  1. Introduction
  2. Essential Point To Remember
  3. New Features Introduced In IIS 7.5
  4. The FastCGI Is Compatible To The Following Versions Of IIS
  5. How To Set Up And Use FastCGI Environment
  6. For the Users of the 2012 or 2012 R2 Windows Server
    1. Step 1: Open Server Manager
    2. Step 2: Select Add Roles and Features
    3. Step 3: Move to the next phase
    4. Step 4: Choose the CGI
    5. Step 5: The Select Features.
    6. Step 6: Install it.
    7. Step 7: End the setup
  7. Setting up FastGCI For Windows 8 or 8.1 Users
    1. Step 1: Open Control Panel
    2. Step 2: Turn the Windows Features on/off
    3. Step 3: Select the CGI
  8. For the users of the 2008 or 2008 R2 Windows Server
    1. Step 1: Open the Server Manager
    2. Step 2: Open the Web Server (IIS)
    3. Step 3: Open the Add Role Services
    4. Step 4: Select the CGI
    5. Step 5: Install it
    6. Step 6: End the Setup
  9. Setting up FastCGI Windows Vista or Windows 7
    1. Step 1: Open Control Panel
    2. Step 2: Open the Turn Windows Features on or Off Menu
    3. Step 3: Select the CGI
  10. Conclusion
  11. Check out these top 3 Windows hosting services:
    1. Was this article helpful?

Introduction

A collection of the elements of the <application> is contained in the element of the <fastCgi> and each of them creates a definition of an application pool for FastCGI. The component of the FastCGI is included in the Internet Information Services (IIS) 7 and it is the component that provides you with a greater performance and a higher reliability and also allows you to run the application frameworks of both the PHP and Web on the IIS 7 platform.

It is required by the definition of the easiest application pool for FastCGI that the attribute “fullPath“, should be included in an element of <application> for defining the binaries used in the framework of the specified application. Also, the attribute “fullPath“should be set to the name of the file and directory of the binaries of PHP, for the PHP’s Framework.

There are some optional attributes which allows you to verify a good number of parameters. They are; the maximum request count which can be processed by a worker process of FastCGI before its recycling, the maximum time range that can be taken by a FastCGI request and maximum application pool worker processes count.

Essential Point To Remember

You should note that if you wish to use FastCGI in processing requests, the first thing to do is to ensure that the path and the specified extension of the file name are mapped to the module of FastCGI. Secondly, the script processor should be specified as the target process of the FastCGI.

New Features Introduced In IIS 7.5

There were some new attributes which were added by the IIS 7.5 to the element “<fastCgi>/<application>” and these elements include:

-The “monitorChangesTo":

It is an attribute which allows you in specifying a file in order to track for those changes which can affect aFastCGI application'sbehavior.AN example is when you are making use of the framework of PHP, you can have IIS configured to track the file of the PHP.INI for those changes by making sure that the full path to the attribute of the "monitorChangesTo"file is specified.

-The "stderrMode":

The attribute is used in specifying the way, errors which an application of a FastCGI returns are handled by IIS 7 through the stream of “STDERR”.

-The "signalBeforeTerminateSeconds"

The attribute allows IIS to be configured to wait for a particular time frame after an application of FastCGI which is to be shut down is signaled by IIS. This allows for any settings of an application of FastCGI application to be cleaned up before the process is terminated by IIS.

The FastCGI Is Compatible To The Following Versions Of IIS

  • IIS 10.0: The <fastCgi> factor was not modified in IIS 10.0
  • IIS 8.5 :The <fastCgi> factor was not modified in IIS 8.5.
  • IIS 8.0: The <fastCgi> factor was not modified in IIS 8.0.
  • IIS 7.5: The <application> factor of the <fastCgi> collection was updated in IIS 7.5 with the monitorChangesTo, stderrMode, and signal Before Terminate Seconds attributes.

IIS 7.0: The <fastCgi> element was introduced in IIS 7.0.

How To Set Up And Use FastCGI Environment

The first thing to do in order to make use of the environment of the FastCGI is to ensure you configure the role service of the CGI. That process of installation have the role service of the Common Gateway Interface (CGI) registered, in the <modules> and <globalModules> element. Note that the following steps are broken into the various servers for a better understanding.

For the Users of the 2012 or 2012 R2 Windows Server

Step 1: Open Server Manager

Navigate your cursor to the taskbar and open the Server manger by clicking.

Step 2: Select Add Roles and Features

When you have gained access into the Server Manager, open the Managemenu, and select the Add Roles and Features option.

Step 3: Move to the next phase

Within Add Roles and Features option, select the Next feature and for the type of installation, select again and tap on next. The destination Server should also be selected too and next should be clicked on again.

Step 4: Choose the CGI

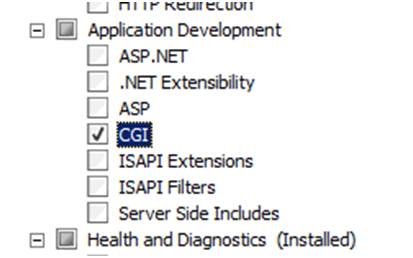
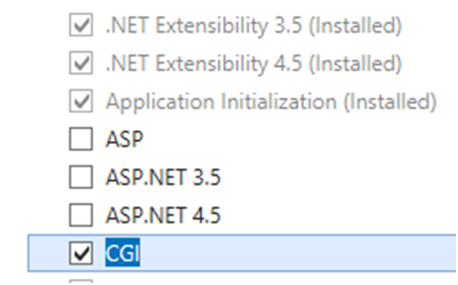
On the page of the Server Roles, open the Web Server (IIS), proceed further to open the Web Server, theApplication Developmentshould be expanded then choose the CGI option as shown below in the image and finally click on the Next icon.
How To Set Up And Use Fastcgi Environment In (IIS) 7, IIS 7

Step 5: The Select Features.

When you have been moved into the page for the Select Features, then click on the Next icon.

Step 6: Install it.

The icon moves you into the page for the Confirm installation selections and then you will click on the Install button which appears.

Step 7: End the setup

After installation, you will be directed to the page for results and that is where you will exit the page by clicking on the Close button.

Setting up FastGCI For Windows 8 or 8.1 Users

Step 1: Open Control Panel

Move the pointer to the bottom of your screen and click on the Start button to open it. When it opens, navigate to the Control Panel and open it too.

Step 2: Turn the Windows Features on/off

When in the Control Panel, click on the Programs and Features and select the Turn Windows features on or off option.

Step 3: Select the CGI

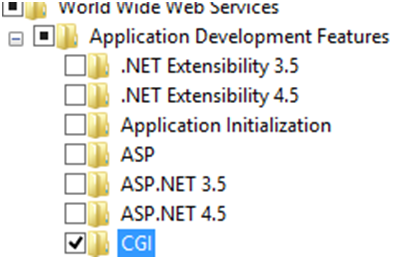
Click on the Internet Information Services to expand, do the same for the World Wide Web Services and finally the Application Development Features till the CGI option is visible which you would then click on to mark it as shown below.
How To Set Up And Use Fastcgi Environment In (IIS) 7, IIS 7

Step 4: Click on the OK button.

Step 5: Click on the Close button to exit

For the users of the 2008 or 2008 R2 Windows Server

Step 1: Open the Server Manager

Click on the Start button found on the taskbar, hover the cursor over the Administrative Tools and when the drop down menu appears, click on the Server Manager to open.

Step 2: Open the Web Server (IIS)

In the pane of the Server Manager, click on the Roles option to expand and then open the Web Server (IIS).

Step 3: Open the Add Role Services

In the pane of the Web Server (IIS), navigate down to the section of the Role Services and select the Add Role Services.

Step 4: Select the CGI

On the page of the Select Role Services in the Add Role Services Wizard, choose the CGI and then click on the Next button.

How To Set Up And Use Fastcgi Environment In (IIS) 7, IIS 7

Step 5: Install it

On the page for the Confirm Installation Selections, click on the Install  option which appears.

Step 6: End the Setup

When installed, then you navigate to the page for the Results and click on the Close button to exit.

Setting up FastCGI Windows Vista or Windows 7

Step 1: Open Control Panel

Click on the Start button you see on the taskbar and open the Control Panel.

Step 2: Open the Turn Windows Features on or Off Menu

When the Control Panel opens, then select the Programs and Features menu and then open the Turn Windows Features on or off menu

Step 3: Select the CGI

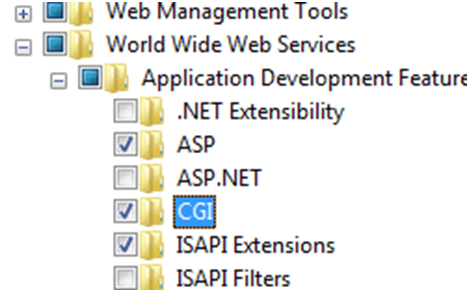
Open the Internet Information Services and select from the menu, the CGI and click on the OK button.

How To Set Up And Use Fastcgi Environment In (IIS) 7, IIS 7

Conclusion

Having completed these for the various IIS platforms, the FastCGI environment setup is hence completed. You should take good care to ensure and note that when setting the FastCGI environment up by the use of the above steps, the platform you are making use of should be that which has the name indicated over the step.

An example is for the users of the 2008 Windows Server. Make sure that you use the steps only under the sub-heading, “for the users of the 2008 or 2008 R2 Windows Server”.

Check out these top 3 Windows hosting services:

0

Was this article helpful?

Submit
How VPS

How VPS

Related Posts

How to install Zabbix on CentOS 7
Control Panels

How to install Zabbix on CentOS 7

January 30, 2020
How To Change The Apache Web Root To Another Directory on an Ubuntu 18.04 VPS or Dedicated Server
Control Panels

How To Change The Apache Web Root To Another Directory on an Ubuntu 18.04 VPS or Dedicated Server

January 30, 2020
How To Enable mod_evasive To Log & Report DOS Attack And BruteForce Attack On Apache
Control Panels

How To Enable mod_evasive To Log & Report DOS Attack And BruteForce Attack On Apache

January 30, 2020
Next Post

How to Create and Extract Zip Files to Specific Directory in Linux

3 Ways to Change a Users Default Shell in Linux

4 Ways to Find Server Public IP Address in Linux Terminal

4 Ways to Find Server Public IP Address in Linux Terminal

Leave a Reply Cancel reply

Your email address will not be published. Required fields are marked *

Follow Us

  • 121 Followers
  • 87.2k Followers

Recommended

How to Encrypt and Decrypt Files and Directories Using Tar and OpenSSL

4 years ago

Useful Commands to Create Commandline Chat Server and Remove Unwanted Packages in Linux

4 years ago
Media Temple Review

Media Temple Review

4 years ago

Setup Magento on CentOS 6

3 years ago

Instagram

    Please install/update and activate JNews Instagram plugin.

Categories

  • Arch
  • Authentication
  • Backups
  • BSD
  • Centmin Mod
  • CentOS
  • Control Panels
  • CoreOS
  • CWP
  • Debian
  • Directadmin
  • Encryption
  • Fedora
  • Firewalls
  • Hocvps Script
  • Hosting providers
  • Kloxo-MR
  • Linux
  • Mitigations
  • Operating System
  • Plesk
  • Reviews
  • Securing VPS/Servers
  • Security Patches
  • SSL Certificates
  • Uncategorized
  • Upgrading
  • VPS/Servers management guides
  • Vulnerability Detection
  • Web servers software
  • Webhosting Control Panel

Topics

Apache Web Server Bluehost Review 2019 Bluehost Review 2020 Bluehost Review 2021 Centmin Mod CentminMod centos install htop fsck htop install HTTP DoS attack Install Snort on an Ubuntu install Zabbix on CentOS install Zabbix on CentOS 7 Linux Commands linux guide linux install htop linux vps setup guide MariaDB MariaDB Error Mysql mysqld error optimize MariaDB optimize Mysql snort Ubuntu
No Result
View All Result

Highlights

Top Free Web Hosting Control Panels To Manage VPS/Dedicated Servers

Webmin Reviews

Virtualmin Reviews

CentOS Web Panel Reviews

Ajenti Reviews

ISPConfig Reviews

Trending

Failed to download metadata for repo 'appstream' on Centos 8
CentOS

How to fix error: Failed to download metadata for repo ‘appstream’ on Centos 8

by How VPS
February 25, 2022
0

I tried to update some extensions by use yum on centOs which I specified in Dockerfile. After...

How to Fix MySQL Error "Plugin 'InnoDB' registration as a STORAGE ENGINE failed"?

How to Fix MySQL Error “Plugin ‘InnoDB’ registration as a STORAGE ENGINE failed”?

November 17, 2020
How to optimize Mysql or MariaDB

How to optimize Mysql or MariaDB

November 3, 2020
Top Free Web Hosting Control Panels To Manage VPS/Dedicated Servers

Top Free Web Hosting Control Panels To Manage VPS/Dedicated Servers

February 17, 2020
Webmin Reviews

Webmin Reviews

February 17, 2020
How VPS – How to use/setup VPS

We bring you the best Premium WordPress Themes that perfect for news, magazine, personal blog, etc. Visit our landing page to see all features & demos.
LEARN MORE »

Recent News

  • How to fix error: Failed to download metadata for repo ‘appstream’ on Centos 8 February 25, 2022
  • How to Fix MySQL Error “Plugin ‘InnoDB’ registration as a STORAGE ENGINE failed”? November 17, 2020
  • How to optimize Mysql or MariaDB November 3, 2020

Categories

  • Arch
  • Authentication
  • Backups
  • BSD
  • Centmin Mod
  • CentOS
  • Control Panels
  • CoreOS
  • CWP
  • Debian
  • Directadmin
  • Encryption
  • Fedora
  • Firewalls
  • Hocvps Script
  • Hosting providers
  • Kloxo-MR
  • Linux
  • Mitigations
  • Operating System
  • Plesk
  • Reviews
  • Securing VPS/Servers
  • Security Patches
  • SSL Certificates
  • Uncategorized
  • Upgrading
  • VPS/Servers management guides
  • Vulnerability Detection
  • Web servers software
  • Webhosting Control Panel

[mc4wp_form]

© 2018 JNews - City News Magazine WordPress theme. All rights belong to their respective owners.
JNews is a top selling 2018 WordPress News, Blog, Newspaper & Magazine Theme.

No Result
View All Result
  • Home

© 2023 JNews - Premium WordPress news & magazine theme by Jegtheme.