• Contact
  • Contact Us
  • Disclamer
  • Home 1
  • Home 2
  • Home 3
  • Privacy Policy
Sunday, May 18, 2025
How VPS - How to use/setup VPS
  • Login
  • Home
  • Management guides
    • Web servers software
      • Directadmin
      • Hocvps Script
      • Centmin Mod
      • CWP
      • Kloxo-MR
      • Plesk
    • Control Panels
    • Securing VPS/Servers
      • SSL Certificates
      • Upgrading
      • Authentication
  • Operating System
    • CentOS
    • Fedora
    • Debian
    • Linux
    • Arch
    • BSD
    • CoreOS
  • Reviews
  • Coupon
    • Domain Coupon
    • Hosting Coupon
No Result
View All Result
How VPS - How to use/setup VPS
No Result
View All Result
Home VPS/Servers management guides

How to Use DNS Made Easy to setup Secondary DNS Services

How VPS by How VPS
November 2, 2018
in VPS/Servers management guides
0
How to Use DNS Made Easy to setup Secondary DNS Services
0
SHARES
91
VIEWS
Share on FacebookShare on Twitter

Contents

  1. First Lookup the IP addresses of Your Name Servers. A Service like Ultratools Can Help
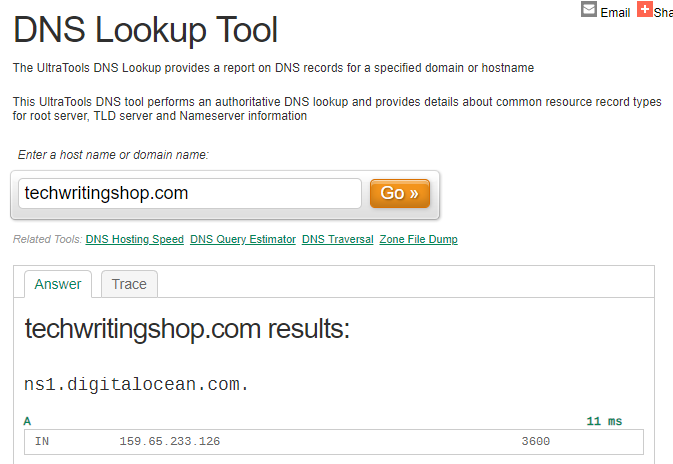
  2. Once You Have The IP Addresses of Your Primary Name Servers Login to DNS Made Easy
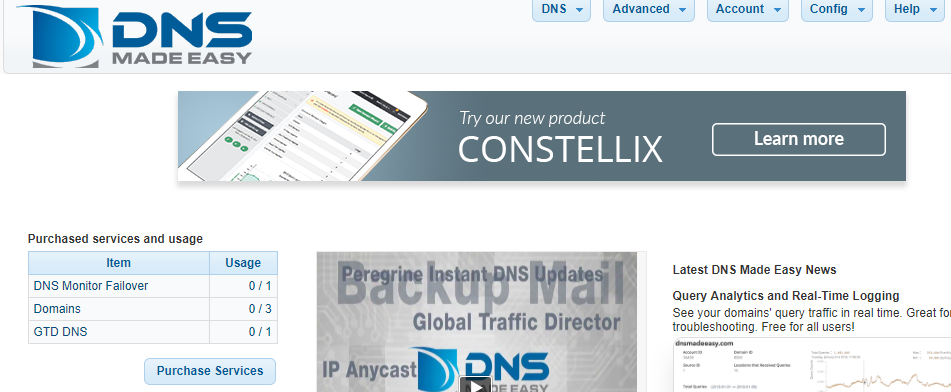
  3. Under “Advanced” Click “Secondary IP Sets”
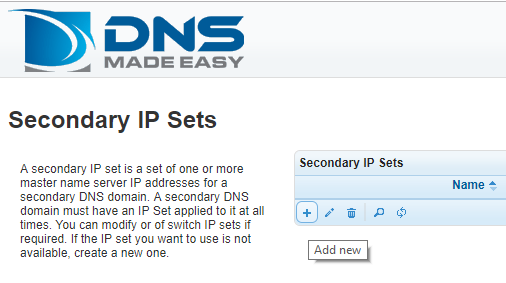
  4. Click the “+” Sign to Create a New IP Set
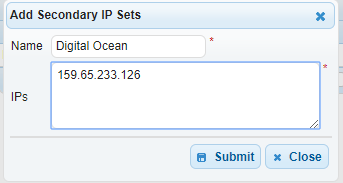
  5. Add the IP Addresses of Your Primary DNS Servers and Name the IP Group then click “Submit”
  6. On the Top Menu Click “DNS” and Then “Secondary DNS”
  7. Click “Add Secondary”
  8. Select the IP Group You Just Created and Put in Your Domain Name then click “OK”
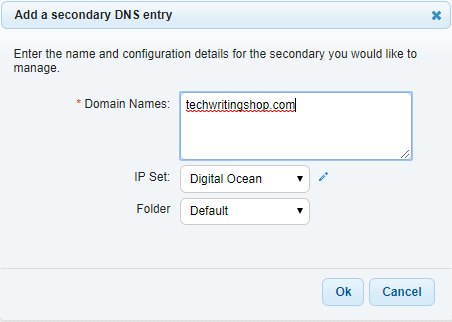
  9. Click “Ok” On the Success Message
  10. Wait a Few Minutes and Take Note of the Secondary DNS Settings
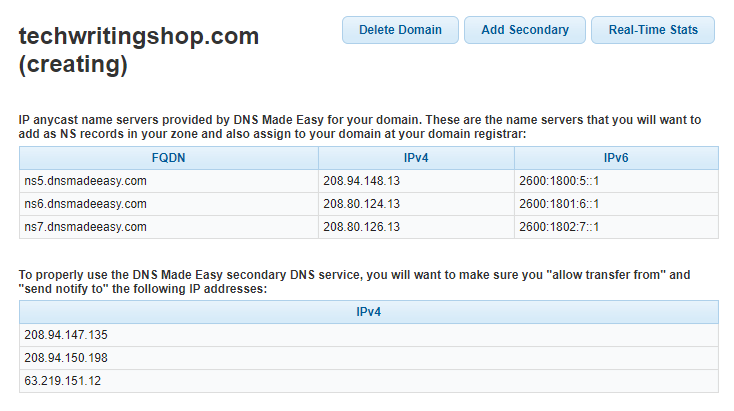
  11. How to Setup Secondary DNS in DNS Made Easy
  12. Add the Name Servers to Your Domain Registrar as Well
  13. Check out these top 3 Best web hosting services
    1. Was this article helpful?

Setting up secondary DNS to keep your website up and running in the event your primary DNS provider goes down is easy with DNS Made Easy. We’re going to assume you have at least trial account with DNS Made Easy setup already.

You’ll also need to be able to login to your DNS manager and make changes. Your DNS hosting service must also support AFXR transfers, which are a method for copying DNS zone files over the Internet. Zone files contain the various records that do things like point to your web hosting (DNS hosting and web hosting are often at the same hosting service), route your email, and so on. Here’s a primer on Managing DNS for Web Hosting.

  1. First Lookup the IP addresses of Your Name Servers. A Service like Ultratools Can Help

How to Use DNS Made Easy to setup Secondary DNS Services

  1. Once You Have The IP Addresses of Your Primary Name Servers Login to DNS Made Easy

How to Use DNS Made Easy to setup Secondary DNS Services

  1. Under “Advanced” Click “Secondary IP Sets”


How to Use DNS Made Easy to setup Secondary DNS Services

  1. Click the “+” Sign to Create a New IP Set

How to Use DNS Made Easy to setup Secondary DNS Services

  1. Add the IP Addresses of Your Primary DNS Servers and Name the IP Group then click “Submit”

How to Use DNS Made Easy to setup Secondary DNS Services

  1. On the Top Menu Click “DNS” and Then “Secondary DNS”

How to Use DNS Made Easy to setup Secondary DNS Services

  1. Click “Add Secondary”

How to Use DNS Made Easy to setup Secondary DNS Services

  1. Select the IP Group You Just Created and Put in Your Domain Name then click “OK”

How to Use DNS Made Easy to setup Secondary DNS Services

  1. Click “Ok” On the Success Message

How to Use DNS Made Easy to setup Secondary DNS Services

  1. Wait a Few Minutes and Take Note of the Secondary DNS Settings

How to Use DNS Made Easy to setup Secondary DNS Services

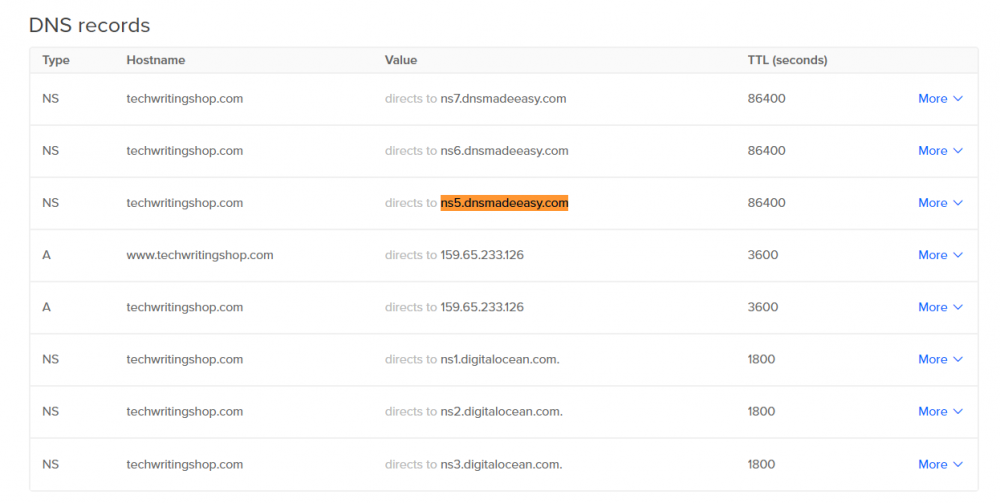
  1. Login to Where Your DNS Records are Managed and Add an NS Record for Each of the DNS Made Easy Servers. You will also need to enable AFXR zone transfers.        How to Use DNS Made Easy to setup Secondary DNS Services
  1. Add the Name Servers to Your Domain Registrar as Well
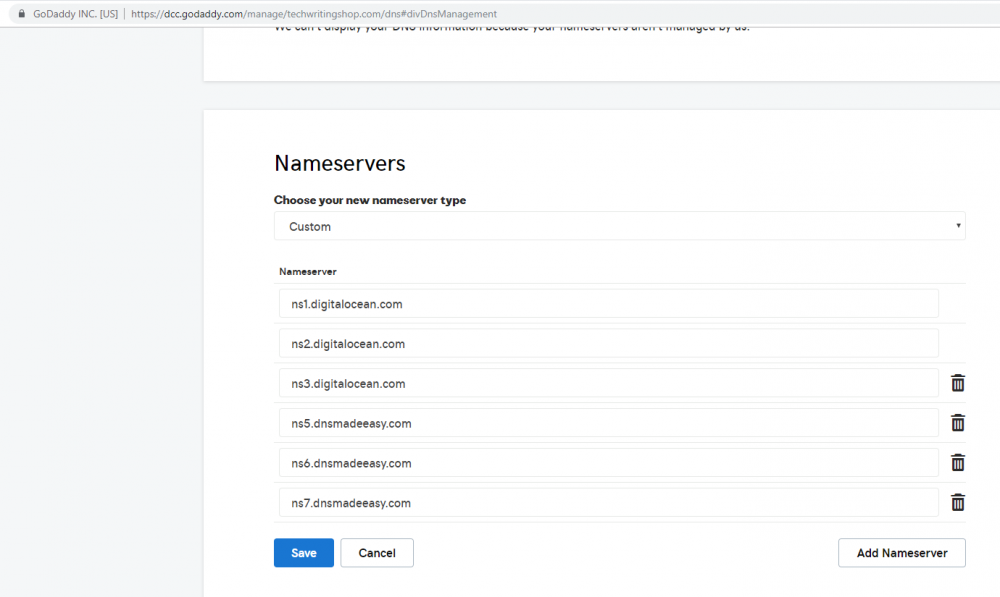
How to Use DNS Made Easy to setup Secondary DNS Services

Once you complete these steps you’ve configured secondary DNS services. Over time DNS requests will go over to whichever DNS servers respond the quickest.

Using a service like DNS Made Easy is a great way to increase the speed and reliability of your website, email and other services.

Check out these top 3 Best web hosting services

0

Was this article helpful?

Submit
Previous Post

How to Keep ‘sudo’ Password Timeout Session Longer in Linux

Next Post

Install Let's Encrypt to Create SSL Certificates

Next Post
Install Let's Encrypt to Create SSL Certificates

Install Let's Encrypt to Create SSL Certificates

Leave a Reply Cancel reply

Your email address will not be published. Required fields are marked *

No Result
View All Result

Recent Post

Install Imagemagick on CentOS
CentOS

Install Imagemagick on CentOS

by How VPS
June 28, 2023
0

This is how I installed Imagemagick on a vanilla CentOS server Start off by installing the prerequisites yum install php-pear...

Read more
how to Check phpinfo

How to Check phpinfo of Hosting or VPS?

June 28, 2023
Failed to download metadata for repo 'appstream' on Centos 8

How to fix error: Failed to download metadata for repo ‘appstream’ on Centos 8

February 25, 2022
How to Fix MySQL Error "Plugin 'InnoDB' registration as a STORAGE ENGINE failed"?

How to Fix MySQL Error “Plugin ‘InnoDB’ registration as a STORAGE ENGINE failed”?

November 17, 2020
How to optimize Mysql or MariaDB

How to optimize Mysql or MariaDB

November 3, 2020

Recent News

  • Install Imagemagick on CentOS
  • How to Check phpinfo of Hosting or VPS?
  • How to fix error: Failed to download metadata for repo ‘appstream’ on Centos 8

Category

  • Arch
  • Authentication
  • Backups
  • BSD
  • Centmin Mod
  • CentOS
  • Control Panels
  • CoreOS
  • CWP
  • Debian
  • Directadmin
  • Encryption
  • Fedora
  • Firewalls
  • Hocvps Script
  • Hosting providers
  • Kloxo-MR
  • Linux
  • Mitigations
  • Operating System
  • Plesk
  • Reviews
  • Securing VPS/Servers
  • Security Patches
  • SSL Certificates
  • Uncategorized
  • Upgrading
  • VPS/Servers management guides
  • Vulnerability Detection
  • Web servers software
  • Webhosting Control Panel
  • About
  • Advertise
  • Careers
  • Contact

© 2025 JNews - Premium WordPress news & magazine theme by Jegtheme.

No Result
View All Result
  • Home
  • Management guides
    • Web servers software
      • Directadmin
      • Hocvps Script
      • Centmin Mod
      • CWP
      • Kloxo-MR
      • Plesk
    • Control Panels
    • Securing VPS/Servers
      • SSL Certificates
      • Upgrading
      • Authentication
  • Operating System
    • CentOS
    • Fedora
    • Debian
    • Linux
    • Arch
    • BSD
    • CoreOS
  • Reviews
  • Coupon
    • Domain Coupon
    • Hosting Coupon

© 2025 JNews - Premium WordPress news & magazine theme by Jegtheme.

Welcome Back!

Login to your account below

Forgotten Password?

Retrieve your password

Please enter your username or email address to reset your password.

Log In
Thabet