Minecraft is an addictive game played by millions worldwide. You have a character in a virtual world that slowly starts out gathering basic resources (mining) and crafting everything from wooden boards to computers. The possibilities are endless and you can create your world to suit anything your imagination desires.
Over the years there have been many Mods developed for Mincraft. We will be using some of these mods in this tutorial, mainly Feed the Beast, FTB. More on that later.
Another great aspect of the game is its multiplayer, so it can be enjoyed by a group of friends. For group play most groups setup their own Minecraft server to host their groups virtual world.
In this Post we will detail how you can setup your VPS to become a Minecraft Game Server. You will need a copy of Minecraft, which you can get from https://minecraft.net.
The first thing you need to do is get a VPS. Any linux VPS will do, we prefer CentOS. If you need more information on setting up a VPS take a look at our previous post How-to Setup a Virtual Private Server.
Once you have your VPS Setup you will need to SSH to it.
ssh root@ cent5
You will need to install Java JRE from java.com
rpm -Uvh FilenameOfJavaDownload.rpm
Next up you need a Minecraft server, but your also going to need an easy way to mange it. I highly recommend an awesome program called McMyAdmin.
McMyAdmin is a web interface and administration utility for Minecraft Survival Multiplayer (SMP) servers. It lets you monitor the servers status, chat with users, manage groups and permissions, schedule events, perform updates and more. Its really easy to get up and running here is how.
First download the Minecraft 2 Supplemental files as root
<pre>cd /usr/local
wget http://mcmyadmin.com/Downloads/etc.zip
unzip etc.zip
rm etc.zip
Next as a non-root user do this:
mkdir ~/McMyAdmin
cd ~/McMyAdmin
wget http://mcmyadmin.com/Downloads/MCMA2_glibc25.zip
unzip MCMA2_glibc25.zip
rm MCMA2_glibc25.zip
Next to run the server enter the following command
./MCMA2_Linux_x86_64 -configonly -setpass NEWADMINPASSWORD
If you would like to run your server in the background so it does not die when you exit your SSH session, you can use screen to accomplish this
screen ./MCMA2_Linux_x86_64
By Default, McMyAdmin only listens on the localhost or loopback address of the server, 127.0.0.1:8080. So in order to connect to it you will need to forward a port over ssh to the server from your local machine.
ssh -f root@ cent5 -L 8080:IPADDRESSOFSERVER:8080 -N
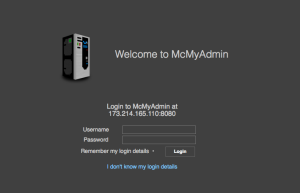
If everything worked as expected you should now be able to access the administrative interface. You can login using the default user and password admin/admin by opening a web browser and opening this URL http://127.0.0.1:8080. You should see a screen like this.

Once you are logged on you can configure your server to your hearts content. When you start your local Minecraft application when you play, select multiplayer and add the IP address of your VPS and Connect
Of course if you are not that technical, or don’t want to go through all this trouble you can also order a VPS preloaded with Minecraft, and McMyAdmin easily with Zoomcloud.net.
They have an easy to use ordering process for Minecraft Game Servers. If you can use a slider, you can order a Minecraft VPS server and be up and running in minutes.
Happy Minecrafting!


