HocVPS Script is a bash script that runs on SSH, which automatically installs all the most necessary components for a VPS with a single command line.
Unlike the other Control Panel, HocVPS Script does not use any server resources (CPU, RAM) and can not have any security errors for hackers to exploit, so you can feel secure to use.
In addition, the webserver will be automatically configured to ensure the best performance, the most secure. Even those who are new to VPS can also manage VPS through the simple command line menu, call by command hocvps
How to install Hocvps Script?
About Hocvps Script
HocVPS Script will automatically install:
- Latest Webserver Nginx.
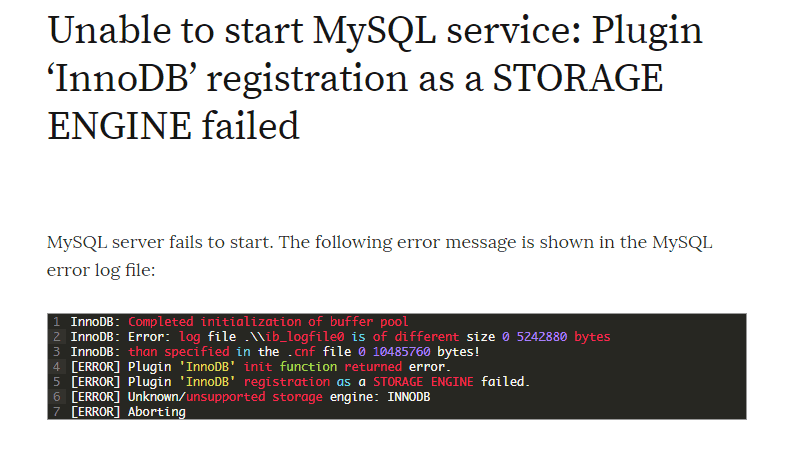
- Latest version Database MariaDB 10.0 (MySQL is optimized).
- Latest PHP versions are optional: PHP 7.1, PHP 7.0, PHP 5.6; Zend OPcache comes.
- Latest phpMyAdmin.
- Latest eXtplorer to manage File Manager, can create users, separate permissions.
Special features:
- Simple installation information, just choose PHP version, main domain and admin port is enough.
- Using Nginx repo instead of compiling from source like other scripts makes installing Nginx faster, it is much easier to upgrade later.
- Replace MySQL with MariaDB to keep up the trend (this is an improved version from MySQL, works similarly but gives higher performance than MySQL; in addition the official CentOS 7 latest version has supported MariaDB).
- Compatible with both CentOS 6 and 7, both 32bit and 64bit play.
- Option to use the installation of PHP 7.1 version (latest), PHP 7.0, PHP 5.6.
- There is the File Manager eXtplorer manager directly on the web.
- Automatically install Zend Opcache module and monitor status right on the web.
- Can be used with both domain www and non-www, automatically redirect to you.
- Automatic update for Nginx, PHP, MariaDB.
- Track server status right on the web, can use mobile access anywhere.
- Change the default SSH port from 22 to 2222 restrict SSH Brute Force Attack, along with Fail2ban IP block right away if it detects login wrong 3 times (apply both SSH and HocVPS Script Admin).
- All management information will be saved in the text file in
/root/hocvps-script.txt
Refer to the new feature in Changelog.
System requirements:
- RAM: minimum 512MB
- Should create swap before installing (if using an SSD or RAID10)
Before proceeding with the installation, you need to grasp some basic knowledge in the article Getting Started, mainly using the SSH connection ZOC Terminal.
Install HocVPS Script
First, you need to prepare a brand new VPS by Reinstall or Rebuild, using CentOS 6 or 7, 32bit or 64bit version are all available. Should use CentOS 7 64bit version with PHP 7.1
SSH connection using ZOC Terminal or Putty with root account. If the account does not have root access, grant it by running sudo su.
Run the following command to proceed with the installation:
curl -sO https://hocvps.com/install && bash install
– Installation is complete, when connect SSH VPS you use port 2222, do not use port 22!
– 04/09/2018: For Vultr VPS, it is recommended to change to Google DNS before installing to avoid the error Could not resolve the host
– HocVPS Script not working on VPS only IPv6 (Vultr’s $ 2.5 package)
Prepare the installation process
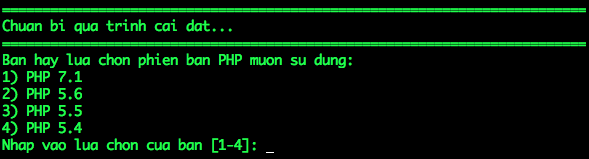
In this step you need to choose:
- PHP version to use: should use PHP 7.1, has 3 times the performance compared to the old version 5.6.
- The main domain name used with VPS, can be imported with www or without www depending on the purpose of use, the script will automatically redirect to you.
- Port admin server management: is a secret port (located in the range 2000-9999, changed after installing) used to:
– Access the admin link, in the form of: http // domain.com: port /
– Using phpMyAdmin, link form: http://domain.com:port/phpmyadmin/
– Manage File Manager, link form: http://domain.com:port/filemanager/
– Monitor system status, link form: http://domain.com:port/serverinfo/
– Track the status of Zend Opcache, link form: http://domain.com:port/op.php
Then, just let the script automatically perform the installation process, which can take 3-5 minutes depending on VPS / Server configuration and network.
Finally, if there is no problem, you will receive a notification of successful installation and VPS management information as shown below. Also, this information will be saved in the text file with the /root/hocvps-script.txt link for you to review later.

So the server is ready for you to use.
Use HocVPS Script:
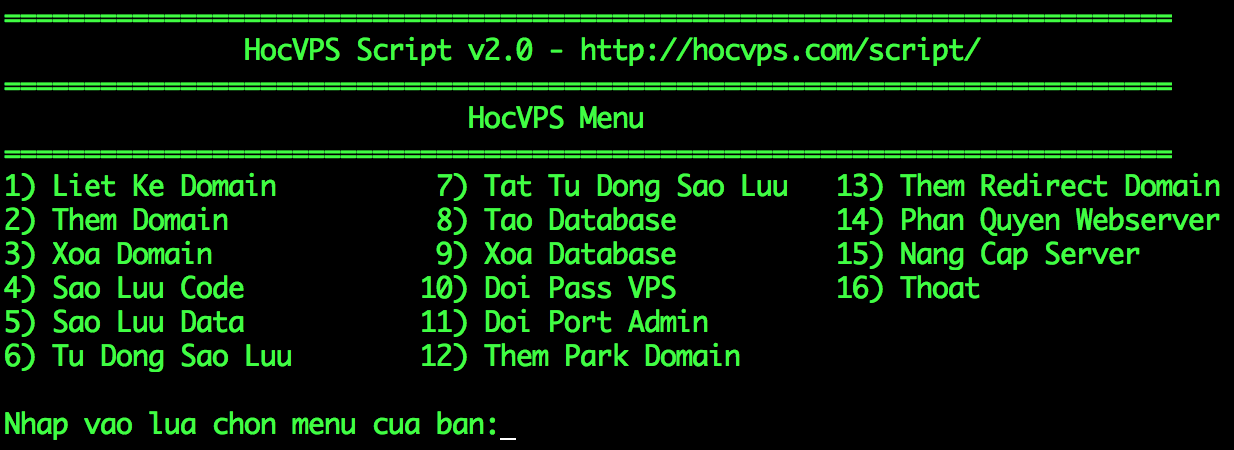
HocVPS Menu is used via
hocvpscommand on SSH Terminal.
After installing HocVPS Script, you can use SFTP to manage File, upload code to /home/domain.com/public_html/ directory and point the domain name to IP VPS and start using.
Note: After uploading the source to the web directory, use the hocvps menu 14 Distributed Webserver Permissions to Nginx to read the website content.
If you want to connect to SSH, use port 2222.
During use, in any function, you can also press Ctrl + C to exit the Script immediately.
Absolute safety security
I always put security and simplicity to the top so from HocVPS Script v1.6 version will add another layer of security when accessing links containing port. You can change this password to make it easier to remember when accessing the admin link http://domain.com:port/.
The default username for all tools is admin, the password is automatically generated after the server is installed. If you enter the wrong information more than 3 times, the IP will automatically block for 1 hour. Increase time according to this guide.