Use Public Key Authentication with SSH

Password authentication is the default method most SSH clients use to authenticate with remote servers, but Public Key authentication has the benefit of convenience and increased security. An SSH key pair consists of a private and a public key, usually an RSA pair. The public key is added to servers you wish to connect to and the private key should be secured on your local machine with strict access rules.
A private key can be encrypted when generated so that only individuals with the decryption password will be able to use the key, even if the key pair itself becomes compromised. A password is only used to unlock the private key locally and is not transmitted to the remote host. For added convenience, and depending on your local workstation’s security, you can add a private key’s decryption password to your local keychain so it’s saved after the first login.
Linux / macOS
Generate a Key Pair
Perform the steps in this section on your Linode or other remote machine.
-
Create a new key pair. While creating the key pair, you will be given the option to encrypt the private key with a passphrase. This means that the key pair cannot be used without entering the passphrase unless you save it to your local machine’s keychain manager. We suggest that you use the key pair with a passphrase, but you can leave this field blank if you don’t want to use one.
Caution
This command will overwrite an existing RSA key pair, potentially locking you out of other systems.
If you’ve already created a key pair, skip this step. To check for existing keys, run
ls ~/.ssh/id_rsa*.If you accidentally lock yourself out of your Linode, use Lish to update your
authorized_keysfile and regain SSH access.ssh-keygen -b 4096 -
Press Enter to use the default names
id_rsaandid_rsa.pubin/home/your_username/.sshbefore entering your passphrase.ssh-keygen -b 4096Generating public/private rsa key pair. Enter file in which to save the key (/home/user/.ssh/id_rsa): Enter passphrase (empty for no passphrase): Enter same passphrase again: Your identification has been saved in /home/user/.ssh/id_rsa. Your public key has been saved in /home/user/.ssh/id_rsa.pub. The key fingerprint is: f6:61:a8:27:35:cf:4c:6d:13:22:70:cf:4c:c8:a0:23 user@linode
Upload Your Keypair
Perform Steps 1 and 2 in this section on your Linode or other remote machine. Perform Step 3 on your local machine.
-
Log in as the user who will be using the key pair. Substitute your own SSH user and host name or IP address below.
ssh [email protected] -
Create the
.sshdirectory andauthorized_keysfile if they don’t already exist on the remote server:mkdir ~/.ssh && touch ~/.ssh/authorized_keys chmod 700 ~/.ssh && chmod 600 ~/.ssh/authorized_keys -
On your local machine, add the public key to the remote server’s
authorized_keysfile. Replace203.0.113.10with the remote IP:scp ~/.ssh/id_rsa.pub [email protected]:~/.ssh/authorized_keys
Connect to the Remote Server
-
SSH into the server from your local machine:
ssh [email protected] -
Depending on your desktop environment, a window may appear, prompting you for the private key’s password you assigned earlier when creating the key pair:
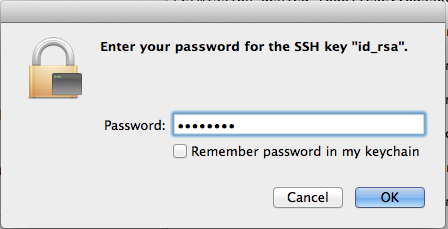
Caution
Do not allow the local machine to remember the password in its keychain unless you are on a private computer which you trust. -
Click OK and you should see the connection establish in the local terminal.
Windows
Generate and Upload a Key Pair with PuTTY
-
Download PuTTYgen (
puttygen.exe) and PuTTY (putty.exe) from the official site. -
Launch
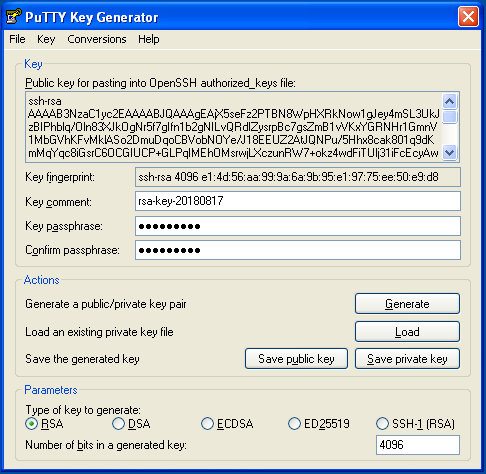
puttygen.exe. TheRSAkey type at the bottom of the window is selected by default for an RSA key pair butED25519(EdDSA using Curve25519) is a comparable option if your remote machine’s SSH server supports DSA signatures. Do not use theSSH-1(RSA)key type unless you know what you’re doing. -
Increase the RSA key size from
2048bits4096and click Generate: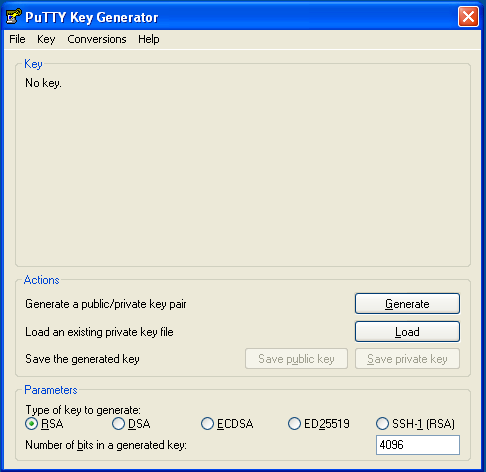
-
PuTTY uses the random input from your mouse to generate a unique key. Once key generation begins, keep moving your mouse until the progress bar is filled:
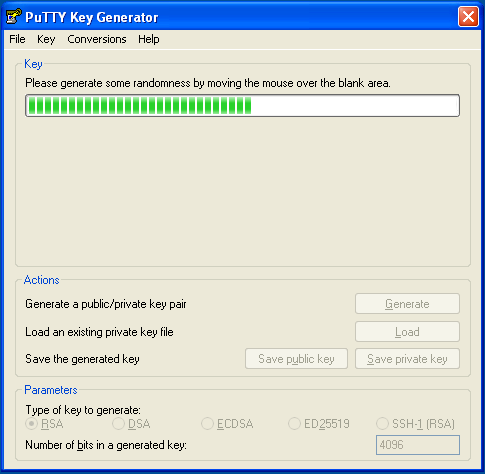
-
When finished, PuTTY will display the new public key. Right-click on it and select Select All, then copy the public key into a Notepad file.
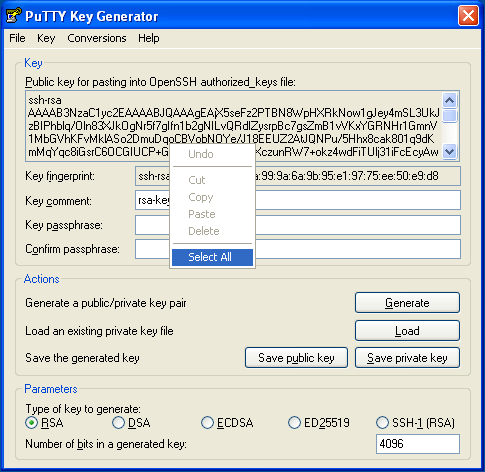
-
Save the public key as a
.txtfile or some other plaintext format. This is important–a rich text format such as.rtfor.doccan add extra formatting characters and then your private key won’t work:
-
Enter a passphrase for the private key in the Key passphrase and Confirm passphrase text fields. Important: Make a note of your passphrase, you’ll need it later:
-
Click Save private key. Choose a file name and location in Explorer while keeping the
ppkfile extension. If you plan to create multiple key pairs for different servers, be sure to give them different names so that you don’t overwrite old keys with new:
Connect to the Remote Server
-
Launch
putty.exe. Find the Connection tree in the Category window, expand SSH and select Auth. Click Browse and navigate to the private key you created above: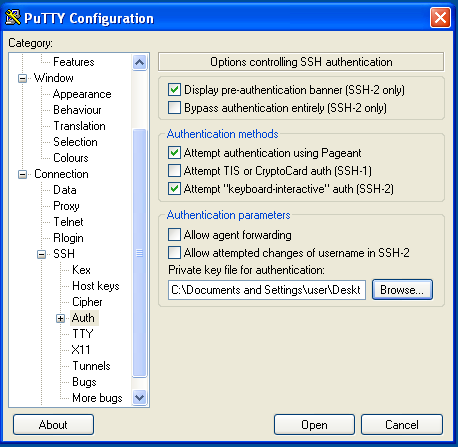
-
Scroll back to the top of the Category window and click Session. Enter the hostname or IP address of your Linode. PuTTY’s default TCP port is
22, the IANA assigned port for for SSH traffic. Change it if your server is listening on a different port. Name the session in the Saved Sessions text bar and click Save: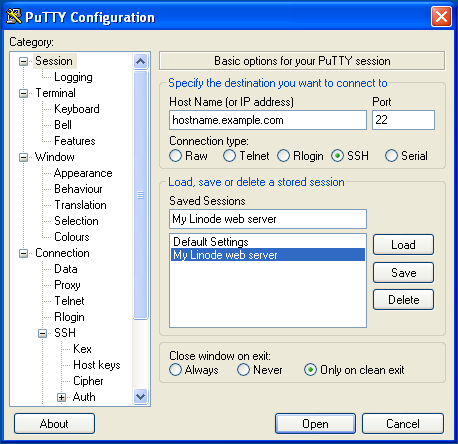
-
Click the Open button to establish a connection. You will be prompted to enter a login name and password for the remote server.
-
Once you’re logged in to the remote server, configure it to authenticate with your SSH key pair instead a user’s password. Create an
.sshdirectory in your home directory on your Linode, create a blankauthorized_keysfile inside, and set their access permissions:mkdir ~/.ssh && touch ~/.ssh/authorized_keys chmod 700 ~/.ssh && chmod 600 ~/.ssh/authorized_keys -
Copy the public key from your local workstation to the
authorized_keysfile on your Linode. When copying from the public key file exported from PuTTY. -
Exit PuTTY, then reconnect and Load your saved session. You’ll be prompted to enter your Linode user’s login name as before. However, this time you will be prompted for your private SSH key’s passphrase rather then your Linode user’s password. Enter the passphrase and press Enter.
Using WinSCP
Uploading a public key from Windows can also be done using WinSCP.
-
In the login window, enter your Linode’s public IP address as the hostname as well as your non-root username and password. Click Login to connect.
-
Once connected, WinSCP will show two file tree sections. The left shows files on your local computer and the right shows files on your Linode. Using the file explorer on the left, navigate to the file where you saved your public key in Windows. Select the public key file and click Upload in the toolbar above.
-
You’ll be prompted to enter a path on your Linode where you want to upload the file. Upload the file to
/home/example_user/.ssh/authorized_keys, replacingexample_userwith your username.
Join our Community
Find answers, ask questions, and help others.
This guide is published under a CC BY-ND 4.0 license.


