TLS (Secure socket layer) and SSL (Secure socket layer) are used for securing the data transfer between client and server. These certificates add a layer of security so that the data which was before sent in the form of plain text and could be analyzed by any third party. This tutorial will lead to create and activate TLS/SSL certificates on Apache server on Ubuntu 18.04.
Generating it by yourself means that you will be a signer and the browser won’t verify the identity. It will also warn the user about the validity of the certificate. It is possible to bypass the certificate. Public facing sites must use a certificate with a trusted certificate authority.
Prerequisites:
- Apache server configured and installed
Step 1: Generate Certificate
- Create a directory place to store the file
        $ mkdir ~/certificates
        $ cd ~/certificates
2. Generate a CSR and private key using following command
$ openssl req -x509 -newkey rsa:4096 -keyout apache.key -out apache.crt -days 365 -nodes
After successfully running the command it will ask for the information of certificate request. Complete it using the appropriate information.
Country Name (2 letter code) [AU]: US
State or Province Name (full name) [Some-State]: FL
Locality Name (eg, city) []: Miami
Organization Name (eg, company) [My Company]: My Company
Organizational Unit Name (eg, section) []:
The common name is your domain name or the server IP address.
Common Name (e.g. server FQDN or YOUR name) []: 192.168.2.3
Email Address []:dummy@example.com
3. Now move the certificate into the same folder you created using the following commands
$ mkdir /etc/apache2/ssl
$ mv ~/certificates/* /etc/apache2/ssl/.
4. We are done creating the certificate now we will make the certificate work with Apache.
Step 2: Configuring the Firewall
- Make sure that the TCP port 443 is open. Instead of port 80 SSL uses port 443. We will be using Uncomplicated Firewall (UFW)
- To enable UFW use the following command
$ sudo ufw enable
- Allow the predefined apache settings for the firewall using the following command
$ sudo ufw allow 'Apache Full'
- You can check the list of current rules using the following command.
$ sudo ufw status
The configuration should be similar to this:
To Action From
— —— —-
Apache Full ALLOW Anywhere
OpenSSH ALLOW Anywhere
Apache Full (v6) ALLOW Anywhere (v6)
OpenSSH (v6) ALLOW Anywhere (v6)
- To allow future connections allow OpenSSH
$ sudo ufw allow 'OpenSSH'
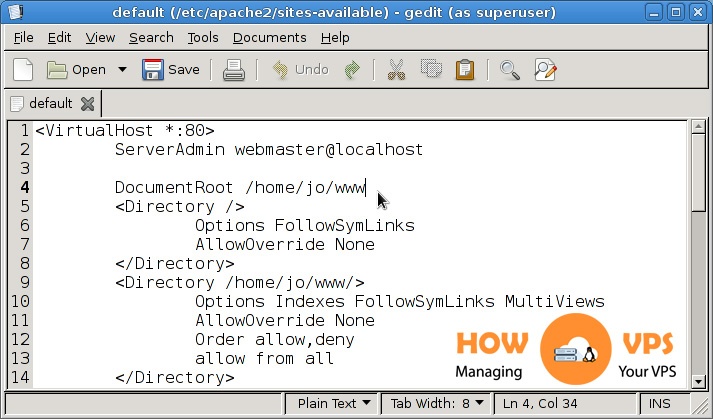
Step 3: Apache virtual host configuration
- Navigate to the default Apache site config directory using the following command
$ sudo nano /etc/apache2/sites-available/default-ssl.conf
This config file tells the server where to find SSL certificate. It should look like this:
<IfModule mod_ssl.c>
<VirtualHost _default_:443>
ServerAdmin webmaster@localhost
DocumentRoot /var/www/html
ErrorLog ${APACHE_LOG_DIR}/error.log
CustomLog ${APACHE_LOG_DIR}/access.log combined
SSLEngine on
SSLCertificateFile /etc/ssl/certs/ssl-cert-snakeoil.pem
SSLCertificateKeyFile /etc/ssl/private/ssl-cert-snakeoil.key
<FilesMatch “.(cgi|shtml|phtml|php)$”>
SSLOptions +StdEnvVars
</FilesMatch>
<Directory /usr/lib/cgi-bin>
SSLOptions +StdEnvVars
</Directory>
</VirtualHost>
</IfModule>
1. Edit this: ServerAdmin webmaster@localhost to this :
ServerAdmin email@example.net
- Add this right below the ServerAdmin line:
ServerName ADD_YOUR_IP_OR_DOMAIN_NAME_HERE
- Now, edit these lines with our certificate location:
SSLCertificateFile /etc/apache2/ssl/apache.crt
SSLCertificateKeyFile /etc/apache2/ssl/apache.key
Our file should look like this:
<IfModule mod_ssl.c>
<VirtualHost _default_:443>
ServerAdmin email@example.net
ServerName 203.0.113.122
DocumentRoot /var/www/html
ErrorLog ${APACHE_LOG_DIR}/error.log
CustomLog ${APACHE_LOG_DIR}/access.log combined
SSLEngine on
SSLCertificateFile /etc/apache2/ssl/apache.crt
SSLCertificateKeyFile /etc/apache2/ssl/apache.key
<FilesMatch “.(cgi|shtml|phtml|php)$”>
SSLOptions +StdEnvVars
</FilesMatch>
<Directory /usr/lib/cgi-bin>
SSLOptions +StdEnvVars
</Directory>
</VirtualHost>
</IfModule>
- Save the file, and close it.
Step 4: Enable the Apache SSL module
- Enable the SSL module using following command
$ sudo a2enmod ssl
- Now enable the site we have just edited:
$ sudo a2ensite default-ssl.conf
- Restart Apache:
$ sudo service apache2 restart
- The website is now secure, access it using following address in the browser
https://YOUR_SERVER_IP
Since the browser will read the certificate as invalid as explained in the introduction. Because the certificate is not signed. Follow the steps according to your browser to proceed.
Check out these top 3 Linux hosting services
0