Introduction
SHOUTcast is a unique software for streaming media over the internet with only a web hosting account with VPS hosting or a dedicated server. When you install SHOUTcast, you can use media players such as Mixxx or Winamp to connect and access a streaming server and broadcast audios to web listeners. It simply uses a classic client-server configuration.
In this article, we will show you how to install SHOUTcast on a Linux server, and how it can be used to broadcast music to clients connect to the server.
Let’s get started!
Step 1 – Downloading And Installing SHOUTcast Server
To enjoy the services of SHOUTcast, you’ll need to start by downloading and installing SHOUTcast on your server.
1. But before you go to the installation, start by creating a new local user to run the DNAs server.
To do so, run the command below:
$ sudo adduser shoutcast
2. Change to the new user’s home directory using the command below:
$ sudo cd /home/shoutcast
3. Now create a SHOUTcast directory by running the command below:
$ sudo mkdir sc
4. You can download the archive using the wget utility by running the following command
For 32-bit:
$ sudo wget
http://download.nullsoft.com/shoutcast/tools/sc_serv2_linux_09_09_2014.tar.gz
For 64 bit:
$
Sudo wget http://download.nullsoft.com/shoutcast/tools/sc_serv2_linux_x64_09_09_2014.tar.gz
5. Once the download is complete, extract the SHOUTcast files and save them to the new directory by running the command below:
$ sudo tar -xzf sc_serv2_linux_09_09_2014.tar.gz -C sc
6. Now change the ownership of your file from root to the SHOUTcast user:
$ sudo chown -R shoutcast.shoutcast /home/shoutcast/sc
The SHOUTcast software is successfully installed on your Linode.
Step 2 – Configuring SHOUTcast Server
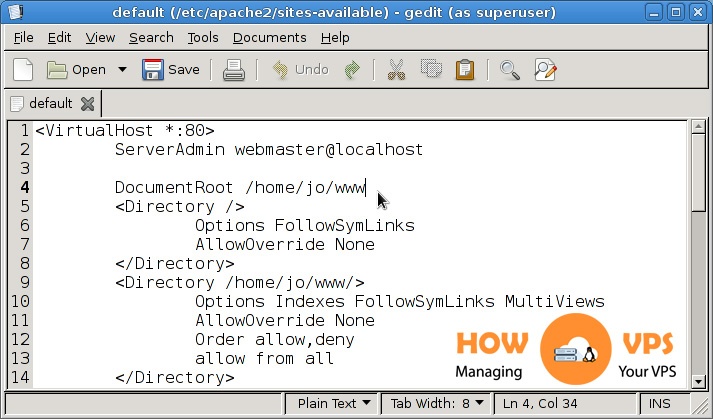
To run the server smoothly, you need to create a SHOUTcast configuration file. This is important to specify your passwords and set the SHOUTcast port.
1. To configure the SHOUTcast server, create sc_serv.conf file in sc directory:
$ sudo nano sc/sc_serv_basic.conf
2. Enter the following line:
adminpassword=password
password=password1
requirestreamconfigs=1
streamadminpassword_1=password2
streamid_1=1
streampassword_1=password3
streampath_1=http://IP.ADD.RE.SS:8000
logfile=sc_serv.log
w3clog=sc_w3c.log
banfile=sc_serv.ban
ripfile=sc_serv.rip
3.Some key information that you need to consider in this step are passwords, which must be changed:
adminpassword: This is the admin password that is needed to perform any remote administration through the web server.
streampassword: Password used by the media player to connect to a media content streaming server.
4. Alternatively, you can configure your server by creating a configuration file. To do so go to the SHOUTcast file and run builder.sh or setup.sh scripts. These will help configure your server from a web browser through the address below:
http://localhost:8000
OR
http://ipaddress:8000
After configuring SHOUTcast service, you can go ahead and copy the file to the installation directory in your server.
5. In order to start running the server, execute the sc_serv file from your working directory. This should be executed in the background, so you will need to use & bash operator and ensure your browser is pointing to the following URL, http://localhost:8000.
$ sudo chmod +x sc_serv
$ sudo ./sc_serv &
$ suod netstat -tulpn | grep sc_serv
6. Press Control-X, then Y to save these changes to the SHOUTcast file
Now, your configuration is set and successfully saved. Go ahead and open the firewall connections.
Step 3 – Opening Firewall Connections
1. By now, the SHOUTcast server should be operating properly, but it cannot be accessed directly due to the firewall restrictions on the platform you’re using. To open your server to external networks, login into your root account and include a rule that will help open and activate port 8000 TCP.
Once the rule has been appended, refresh the Firewall in order to apply these changes and remember to log out from your account.
$ sudo firewall-cmd --add-port=8000/tcp --permanent$ sudo firewall-cmd --reload$ sudo exit
You should get the following output for the radio server:
[radio@linuxhelp server]$ su
Password:
[root@linuxhelp server]# firewall-cmd --add-port=8000/tcp --permanent
success
[root@linuxhelp server]# firewall-cmd --reload
success
[root@linuxhelp server]# exit
exit
2. Now, open a new browser from your machine then enter the IP address of the server with port 8000, that is http://192.168.1.80:8000. Now the SHOUTcast interface will appear as shown in the below but without live streams.

Step 4 – Managing SHOUTcast Server And Creating A Daemon Script
1. The binary file command is used to manage SHOUTcast radio server. In this process, you should run the file from its installation location to effectively read the server’s configuration file.
To run the server as a daemon, use the following command.
$ sudo pwd  ## Assure that you are in the right installation directory - /home/radio/server
$ sudo ./sc_serv   ## Start the server in foreground - Hit Ctrl + c to stop
$ sudo ./sc_serv daemon  ## Start the server as a daemon
$ sudo Ps aux | grep sc_serv   ## Get Server PID
$ sudo  killall sc_serv  ## Stop server daemon
It’s also possible to instruct the server to read the configurations from another location by indicating where the configuration file is located. But, it is important to note that using this option requires you to create logs and control directories to ensure the process runs smoothly.
2. To either start or stop the SHOUTcast server with simple commands, create an executable script (known as radio) through the root account user at /usr/local/bin/ using the command below:
$ sudo nano /usr/local/bin/radio
3. Now add the information below to the radio file.
#!/bin/bash
case$1in
start)
cd /home/radio/server/
./sc_serv &
;;
stop)
killall sc_serv
;;
start_daemon)
cd /home/radio/server/
./sc_serv daemon
;;
*)
echo"Usage radio start|stop"
;;
esac
4. Once the file is created, make it executable, then exit the root account with the command below:
$ sudo chmod +x /usr/local/bin/radio
# sudo exit
5. You will be required to use the radio command below when you want to manage the server
$  sudo radio start_daemon                $ Sudo  radio start
$ sudo radio stop
6. If you would like to start over the server after rebooting, run the command below from the radio account main path. But, you need to log out then log in once more to check whether it’s working as shown below:
$ sudo  whoami
$ sudoecho"radio start_daemon" >> ~/.bashrc


Conclusion
That’s it! The SHOUTcast server is now ready for use. You can receive playlists or favorite sounds from media players such as Mixxx and Winamp and broadcast the content received online.
Check out these top 3 Linux hosting services
0