Introduction
OnwCloud is a reliable, self-hosted PHP web application designed to support file sharing and data synchronization. It’s a secure, open-source collaboration package that enables web users to manage contacts, files, calendars, and more in a unified location.
This tutorial will help you install and set up ownCloud on your Debian 9 system to boost security and give you the control of all content.
Before You Start
For the process to run flawlessly, you require the following:
- The LAMP (Linux, Apache, MySQL, and PHP) Stack installed on your Debian 9 system.
Step 1 – Installing An OwnCloud Instance
The default Debian repository does not come with an ownCloud package. Fortunately, ownCloud has its dedicated repository which can be added to your system to facilitate the installation. Let’s incorporate the ownCloud repository to Debian 9.
First, run the command below to update the local package index:
$ sudo apt update
Next, execute the command below to install the apt-transport-https packages which enable you to utilize the deb https:// to signify external repositories used over HTTPs.
$ sudo apt install curl apt-transport-https
Now, use the command below to obtain OwnCloud release keys before importing it together with its apt-key utility:
$ curl https://download.owncloud.org/download/repositories/production/Debian_9.0/Release.key | sudo apt-key add -
OwnCloud release key features the Pretty Good Privacy (PGP) public key that is used by apt to authenticate the package for onwCloud.
Besides, importing this key, you should generate a file in the apt directory, sources.list.d and name it owncloud.list. This file will feature an address to your ownCloud server repository:
echo'deb http://download.owncloud.org/download/repositories/production/Debian_9.0/ /' | sudo tee /etc/apt/sources.list.d/owncloud.list
Now, source and implement ownCloud using the apt package manager. In addition to installing ownCloud, the command below will add the PHP libraries required to extend ownCloud functionality.
$ sudo apt update
$ sudo apt install php-bz2 php-curl php-gd php-imagick php-intl php-mbstring php-xml php-zip owncloud-files
That’s it! All the things you need are installed.
Step 2 – Modifying Apache Document Root
The newly installed ownCloud package will copy web files in the directory /var/www/owncloud on your Debian 9 server. However, the configuration file for the Virtual Host is currently configured to deliver files from a different location. For this reason, you should modify the Apache document root in the configuration so that it points to your new ownCloud directory.
Now, use the apache2ctl utility to pinpoint the Apache virtual host config files pointing to your IP address or the domain name. The command below will help you achieve this and filter your output using your IP address or the domain name. Remember to replace the value server_domain_or_IP with your IP address or domain name:
$ sudo apache2ctl -t -D DUMP_VHOSTS | grep server_domain_or_IP
This will give you an output similar to:
*:443                  server_domain_or_IP (/etc/apache2/sites-enabled/server_domain_or_IP-le-ssl.conf:2)
         port 80 namevhost server_domain_or_IP (/etc/apache2/sites-enabled/server_domain_or_IP.conf:1)
The files in parentheses are the files pointing to your IP address or domain name. Now, go ahead and edit these files. Execute the command below to open the first file.
$ sudo nano /etc/apache2/sites-enabled/server_domain_or_IP.conf
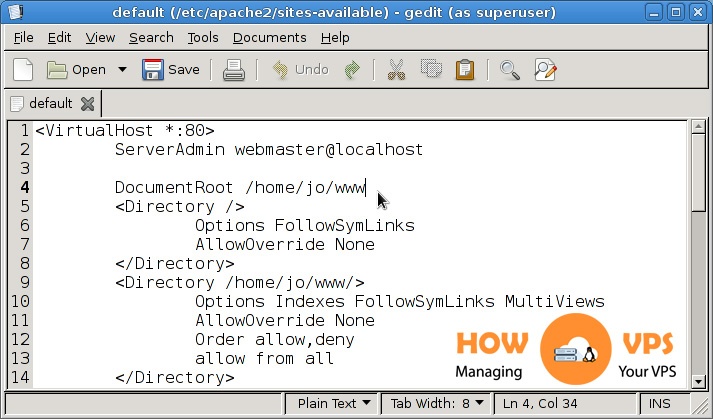
Once the file is opened, look for a directive of the DocumentRoot and modify the line to point to the directory, /var/www/owncloud. That is:
<VirtualHost *:80>
    . . .
    DocumentRoot /var/www/owncloud
    . . .
</VirtualHost>
Save the file and exit the text editor. Repeat this for the other files.
Once you modify all the files, run the command below to confirm that the syntax is ok:
$ sudo apache2ctl configtest
If there are no errors or detectable typos, you will get the following output:
Syntax OK
If you notice an error, check your files and correct any typing error. Once the syntax test is passed, run the command below to reload your Apache service:
$ sudo systemctl reload apache2
By now, Apache should be able to serve the ownCloud server files.
Step 3 – Setting Up Your Database
Your ownCloud is almost set, but before you perform the final configuration, you need to configure your MySQL database. This is because you will need a database name as well as a username and password for the database to enable ownCloud to securely and successfully connect data within MySQL.
If you have not configured the password authentication for your database, run the command below to log into your MySQL admin account:
$ sudo mysql
Alternatively, if you have implemented password authentication, use the command below to view the database administrative account:
$ mysql -u admin -p
Once you log in, create a database that is specifically dedicated to ownCloud and call it owncloud.
CREATEDATABASE owncloud;
Next, you have to create another MySQL database user account that will be used to control the new database. In this tutorial, we’ll call the user account, owncloud. Be sure to replace this name with your desired value.
GRANT ALL ON owncloud.* to'owncloud'@'localhost'IDENTIFIEDBY'owncloud_database_password';
Note: The value owncloud_database_password in the command above should be replaced with an actual password.
Now, run the command below to allow the current MySQL instance to acknowledge the recent privileges assignments.
FLUSHPRIVILEGES;
Exit your MySQL session:
exit
The database of fully configured and it’s okay if you proceed with the final web configuration
Step 4 – Setting Up OwnCloud
First, you need to get to the web interface for ownCloud via your favorite browser.
https://server_domain_or_IP
Once, you access the ownCloud server configuration page for ownCloud, create a new admin account. Remember to use easy-to-remember, but essentially strong values for the password and username.

Do not change ownCloud data folder settings! Access the configuration part of the database. Here provide your database name and username and the passowrd corresponding to this database. This username and the password should be the credentials set in step 3. For your database host, just leave it as a localhost.

Click Finish setup to enable ownCloud to utilize the details provided to complete the configuration. Once everything is set you will see this login screen:

Type your username and password and press ENTER to log in. Once you login you will see the following screen:

You can now download apps to help you synchronize files on multiple devices, then click X on the top-right section of your page to view the main owvCloud interface. Once you are on this interface create and upload folders to your ownCloud account.
Conclusion
That is it! You have successfully installed and configured ownCloud on your Debian 9 system. You can now enjoy the power and convenience that come with this application.
Check out these top 3 Cloud hosting services:
0