IIS 6.0 is a significant improvement over previous versions. It includes a number of security enhancements and features. Unfortunately, many of basic services which came out of the box in previous versions need to be installed in the form of Windows Server 2003 Application Server Modules.
IIS is made up of various modules which include File Transfer Protocol (FTP) services, FrontPage Server Extensions, Internet Printing, Simple Mail Transfer Protocol (SMTP) and the web services. Each one has to be installed independently, and they may be dependant on other modules.
The different IIS modules are installed from the Add/Remove Programs option in the Control Panel. There is no requirement to install any specific module if you don’t need it. This article is going to go over how to manage and install web services in IIS.
How to Install WWW Service With Minimal IIS Setup

Step 1: Open the Control Panel
When the control panel screen opens, locate and double-click “Add or Remove Programs”. When the window opens, click on the “Add/Remove Windows Components”.
Step 2: Highlight the Application Server Component
When you highlight the component, avoid clicking on the checkbox. Just click on the “Details…”.
Step 3: Pick Internet Information Services (IIS)
When the window opens, choose the IIS but again avoid clicking on the checkbox. Click on “Details…”.
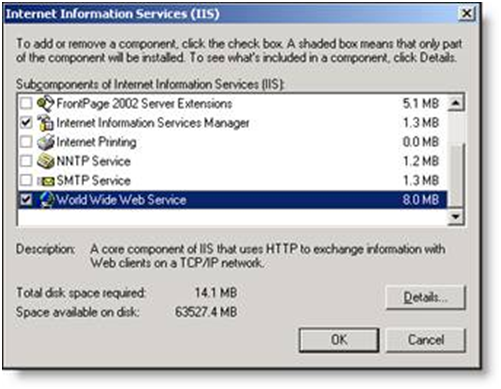
Step 4: Check The Dialog Box Beside the WorldWide Web Service
When you get to this point, check the box that represents the WWW Service and click “Ok”.
Step 5: Click The Okay Button
On the Apps Server dialog box, click “OK”, followed by “Next”. Thiswill enable the Windows Components dialog box to initiate the WWW services installation and configuration process.
Step 6. Click On The Finish Button
When the Windows Components Wizard finishes installing and configuring the WWW service, close the Add or Remove Programs dialog box.
The default web server is barebone. It doesn’t come with any advanced features. So, if you want to set up Advanced features like Active Server Pages (ASPs), ASP.NET, Web Distributed Authoring, and Versioning (WebDAV) publishing and FrontPage server extensions, you must install them separately.
How To Manage Web Server Using IIS Manager Snap-in
To manage a web server from its local console or over the local access network connection, you can utilize the IIS Manager snap-in. The snap-in file is iis.msc.By default it is in the folder– %systemroot%system32inetsrv.
You can start the Internet Information Service Manager by incorporating the snap-in to an MMC window. Alternatively, you can start it by going to “Start” then “All Programs”. In “All Programs” locate “Administrative Tools” and from it click on “Internet Information Services (IIS)”. Note that for this to work, both IIS 6.0 and the Windows Server 2003management tools need to be installed on the system.
The dedicated Web server emerges as a root node in the left panel or window of the Internet Information Service Manager console. Underneath the Web Server node, you’ll observe the “App Pools secondary node”, the “Web Sites secondary node” and the “Web Service Extensions secondary node”.
IIS 6.0 makes use of a preset processing system referred to as the Worker Process Isolation mode for clean installations of Window Server 2003. You can also decide to run the server in IIS 5.0 Isolation mode. This is a pre-configured mode that comes with Windows 2000 Server.
Here is a description of the different tabs on the Web Sites attributes dialog box:
- Service tab: This helps you to configure HTTP compression.
- Website tab: This tab helps you to set up website ID, network settings and website login.
- Theperformancetab: This tab allows you to setup bandwidth throttling and set the maximum number of websites attached to the server.
- ISAPI Filters tab: This lets you work with ISAPI filter settings.
- HTTP Headers: This lets you set up your HTTP headers.
- Home Directory tab: This allows you to set home directory permissions at the global level. The tab also lets you configure the setup for global access for viewing, writing, and offering directory browsing access.
- Directory Security tab lets you set up global directory security settings. It also allows you to configure access control settings, access settings, and the directory service mapper.
- Custom Errors tab lets you edit HTTP error messages.
- Documents tab is used to setup static content.
When you right-click on the “Web Server”, and click on “All Tasks”, followed by “Restart IIS”, you can discontinue, create, initiate or restart all Internet services or restart the server if you have permissions to execute these functions.
Check out these top 3 Best web hosting services
0


