Introduction
Let’s Encrypt is a free, reliable, and automated Certificate Authority (CA) designed by the non-profit Internet Security Research Group (ISRG). The CA utilizes fully automated processes to deliver free SSL/TLS certificates, quashing the need for the creation, installation, verification, and renewal of SSL certificate manually..
Let’s Encrypt is trusted by leading programs simply because it is secure, transparent, cooperative, and automatic. The CA provides the digital certificates required to enable HTTPS for websites and create a privacy-respecting and secure web.
This tutorial will help you secure the Apache service using Let’s Encrypt via the reliable certbot tool on your Ubuntu 18.04 VPS hosting or dedicated server hosting.
Ready? Let’s get started!
Before You Start
For this process to run smoothly, you require the following:
- A domain
- Apache installed on your server
- Fully configured Apache virtual hosts for the domain name. You can use our guide “ How to set up Apache Virtual Hosts on Ubuntu 18.04” to configure the virtual hosts.
If everything is in place we can now embark on the installation.
Step1 – Installing Certbot
The first thing when securing Apache with Let’s Encrypt is installing the certbot tool. This tool automates and streamlines the process of getting and renewing the SSL certificates from Let’s Encrypt. Besides, it will help you configure your web server to use these certificates.
First, update the local package index:
$ sudo apt update
Then, execute the command below to install Certbot:
$ sudo apt install certbot
That’s it! You have installed the certbot tool successfully.
Step 2 – Generating Strong DH Group
The DH or the Diffie Hellman group is a reliable key exchange group that creates a secure environment to facilitate the exchange of cryptographic keys via a communication channel that is unsecured.
Run the command below to create a suite of 2048-bit DH characters:
$ sudo openssl dhparam -out /etc/ssl/certs/dhparam.pem 2048
Note: If you wish you can replace the size 2048 with 4096. By doing so, you should be patient because the generation of the DH parameters can take thirty minutes or more minutes depending on your system entropy.
Step 3 – Getting An SSL Certificate
Once the Dh group is generated, you can now obtain the SSL certificate required for your unique domain. In this tutorial, we’ll use example.com as our domain name; remember to replace this value with your true domain name.
In this step, we’ll utilize a Webroot plugin to create a file for example.com in the directory ${webroot-path}/.well-known/acme-challenge. The validation server for Let’s Encrypt will make HTTP appeals to authenticate that the domain’s DNS resolves to a server running the certbot tool.
We’ll simply map HTTP entreaties for the .well-known/acme-challenge to /var/lib/letsencrypt. Now, run the commands below to create the required directory and enable it to be writable for your Apache server.
$ sudo mkdir -p /var/lib/letsencrypt/.well-known
$ sudo chgrp www-data /var/lib/letsencrypt
$ sudo chmod g+s /var/lib/letsencrypt
Next, create two unique configuration snippets to prevent code duplication. First, run the command below to open the first configuration file:
$ sudo nano /etc/apache2/conf-available/letsencrypt.conf
Add the content below into this file:
Alias /.well-known/acme-challenge/ "/var/lib/letsencrypt/.well-known/acme-challenge/"
<Directory "/var/lib/letsencrypt/">
    AllowOverride None
    Options MultiViews Indexes SymLinksIfOwnerMatch IncludesNoExec
    Require method GET POST OPTIONS
</Directory>
Save and exit this file.
Next, execute the command below to open the second configuration file:
$ sudo /etc/apache2/conf-available/ssl-params.conf
Copy and paste the content below into this file:
SSLCipherSuite EECDH+AESGCM:EDH+AESGCM:AES256+EECDH:AES256+EDH
SSLProtocol All -SSLv2 -SSLv3 -TLSv1 -TLSv1.1
SSLHonorCipherOrder On
Header always setStrict-Transport-Security"max-age=63072000; includeSubDomains; preload"
Header alwaysset X-Frame-Options DENY
Header alwaysset X-Content-Type-Options nosniff
# Requires Apache >= 2.4
SSLCompression off
SSLUseStapling on
SSLStaplingCache "shmcb:logs/stapling-cache(150000)"
# Requires Apache >= 2.4.11
SSLSessionTickets Off

SSLOpenSSLConfCmd DHParameters "/etc/ssl/certs/dhparam.pem"
Save and exit the file.
Note: The second configuration snippet utilizes chippers authorized by HSTS ( HTTP Strict Transport Security) and Cipherli.st. The snippet enforces security-centric HTTP headers and activates the OCSP Stapling.
Now, run the commands below to enable Apache SSL module and the mod_headers:
$ sudo a2enmod ssl
$ sudo a2enmod headers
Next, execute the commands below to enable the SSL virtual Host and the ssl-params.conf file:
$ sudo a2enconf letsencrypt
$ sudo a2enconf ssl-params
Restart your Apache configuration to implement the changes:
$ sudo systemctl reload apache2
The stage is set, and you can now implement the certbot using a Webroot plugin to get your SSL certificate:
$ sudo certbot certonly --agree-tos --email admin@example.com --webroot -w /var/lib/letsencrypt/ -d example.com -d www.example.com
Once the certificate is obtained, you will get the message below:
IMPORTANT NOTES:
 - Congratulations! Your certificate and chain have been saved at:
   /etc/letsencrypt/live/example.com/fullchain.pem
   Your key file has been saved at:
   /etc/letsencrypt/live/example.com/privkey.pem
   Your cert will expire on 2018-10-28. To obtain a new or tweaked
   version of this certificate in the future, simply run certbot
   again. To non-interactively renew *all* of your certificates, run
   "certbot renew"
 - If you like Certbot, please consider supporting our work by:

   Donating to ISRG / Let's Encrypt:   https://letsencrypt.org/donate
   Donating to EFF:                    https://eff.org/donate-le
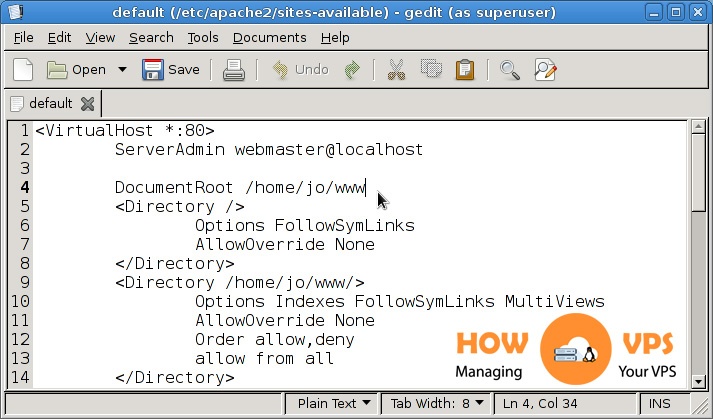
Step 4 – Modify The Virtual Host File Configuration
Execute the command below to open the configuration file for your unique domain:
$ sudo nano /etc/apache2/sites-available/example.com.conf
Add the content below to this file;
<VirtualHost *:80>
  ServerName example.com
  ServerAlias www.example.com

  Redirect permanent / https://example.com/
</VirtualHost>

<VirtualHost *:443>
  ServerName example.com
  ServerAlias www.example.com

  <If "%{HTTP_HOST} == 'www.example.com'">
    Redirect permanent / https://example.com/
  </If>

  DocumentRoot /var/www/example.com/public_html
  ErrorLog${APACHE_LOG_DIR}/example.com-error.log
  CustomLog${APACHE_LOG_DIR}/example.com-access.log combined

  SSLEngineOn
  SSLCertificateFile /etc/letsencrypt/live/example.com/cert.pem
  SSLCertificateKeyFile /etc/letsencrypt/live/example.com/privkey.pem
  SSLCertificateChainFile /etc/letsencrypt/live/example.com/chain.pem

  # Other Apache Configuration

</VirtualHost>
Next, reload your Apache service:
$ sudo systemctl reload apache2
Open your websites and check if you will see the green lock icon
Step 5 – Setting Up Auto-Renewal
The newly installed SSL certificate is valid for only 90 days. You can set up the Certbot package to renew your SSL certificate automatically before its expiration date. The package generates a cronjob that runs two times every day, renewing the certificate a month before it expires.
Every time the SSL certificate is automatically renewed Apache Service must be reloaded. To enable this, modify the /etc/cron.d/certbot file with the –renew-hook “systemctl reload apache2”, hook.
This file will look like:
0 */12 * * * root test -x /usr/bin/certbot -a ! -d /run/systemd/system && perl -e 'sleep int(rand(3600))' && certbot -q renew --renew-hook "systemctl reload apache2"
Next, run the command below to confirm the automatic renewal:
$ sudo certbot renew --dry-run
If you get no errors, then the automatic SSL certificate renewal process has been set correctly.
Conclusion
That’s it! You have successfully used the certbot tool and Let’s Encrypt to obtain an SSL certificate for your specific domain name.
Check out these top 3 Linux hosting services
0